Antenna Display and Switching
The MOAS Client has two ways to display and select antennas. They can be displayed as a list or as a grid of buttons. The grid of buttons offers more powerful selection but the list is a simpler way of looking at what is selected.
Antenna Display
Section titled “Antenna Display”The Antenna Display windows show a list of antennas. A window can show the antennas for one radio or for several.
A list may only have one antenna or it may have several. It may show the receive antenna when it is different from the transmit antenna.
This is the default antenna display, which is what is shown if an antenna display is configured but none of the configuration options are changed from the defaults:
And this is the same display when the transmit and receive antennas are different:
Since this display only shows the selected antenna it cannot be used to choose a different antenna.
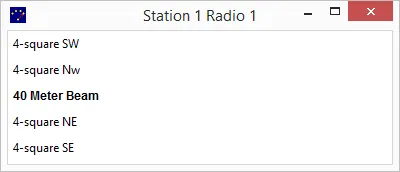
If the window shows more than one antenna it will display other antennas which are configured for the radio and it can optionally be used to select them. Here is an example which displays five antennas, transmit only, with the selected antenna shown in bold type:
It is possible to place the selected antenna in the centre of the list. If this is done the list of antennas is treated like a loop and is rotated until the selected antenna is centred:
The windows can also be resized. They often must be resized because when they are originally created they may be too narrow to show the title.
The size and location of the window is remembered so if you stop the client the next time it runs it will put all of the windows where they were previously. The exception is if you reconfigure a window — then it reverts to the default size and position.
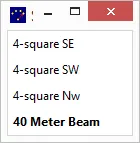
In this case the window is configured to show a maximum of four antennas. There are five antennas available on this band so one is not shown. The list will be shifted if necessary so the selected antenna will be shown.
If a radio has more antennas than will fit in the list then the button grid is probably a better choice for selecting antennas.
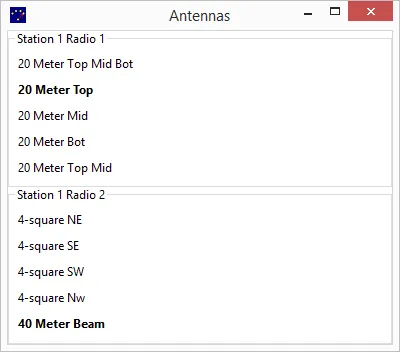
One window can show antennas for more than one radio.
The names of the sections are configurable. They were set to make it obvious which radio they are showing.
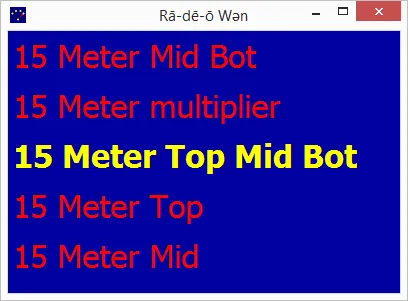
Fonts and colours can also be changed:
The Antenna Display can be run on any PC that can connect to the server.
Antenna Selector
Section titled “Antenna Selector”The Antenna Selector shows a grid of buttons which can be clicked to select antennas. Some buttons may also perform functions. The antennas and functions and their layout is controlled by the server.
A window shows the antenna choices for one radio. That can be for a specific station and radio or if the window is running on the same PC as the logging program it can be the radio that has focus in the logging program.
An antenna can be in one of three states — it can be unavailable, available, or selected. And this can be different for transmit and receive. An antenna is unavailable if it cannot be selected such as when another station is using it. It is available if it could be selected.
The top half of a button shows the transmit state and the bottom shows the receive state.
Available and unavailable are represented by different colours. Selected may be represented by a different colour or by a stripe on an available button. The colours, font, button shape, stripe colour, and stripe width are configurable.
This is the default antenna selector, which is what is shown if an antenna selector is configured but none of the configuration options are changed from the defaults:
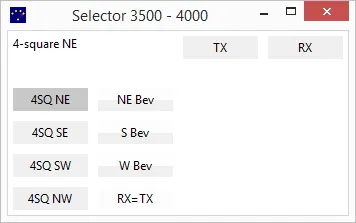
The selected antenna is displayed in the upper left corner. There are TX and RX buttons which are used to change only the transmit or receive antennas. These items can be configured as desired.
The top half of the three beverage buttons is the colour which shows that an antenna is unavailable. This is because these are receive-only antennas which cannot be selected for transmit.
The RX=TX button is for a function which sets the receive antenna to be the same as the transmit antenna. It is unavailable because transmit and receive are already using the same antenna.
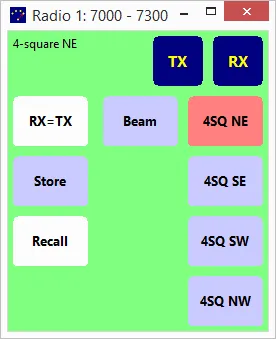
Colourful Selector
Section titled “Colourful Selector”This is a more colourful selector:
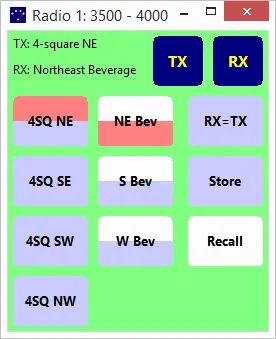
The selected antennas are the 4-square NE for transmit and the NE Beverage for receive. RX=TX is available.
The Store and Recall buttons are a pair of functions that work together. Store remembers the current antenna and Recall switches to the last saved antenna if possible. The Store function is available. The Recall function is not because no antenna has been stored.
There is a slightly larger gap between the second and third columns and the first two, which in this case separates the antenna selection buttons from the functions. This is optional and configurable.
Button Styles
Section titled “Button Styles”There are several different types of buttons available. And the selected antenna can be shown by either a colour change or by a stripe:
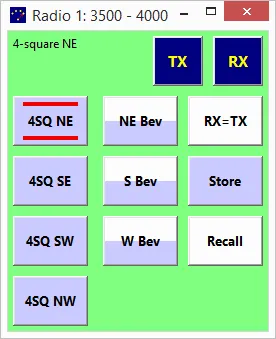
This example shows 3D buttons for the antenna and the TX and RX buttons.
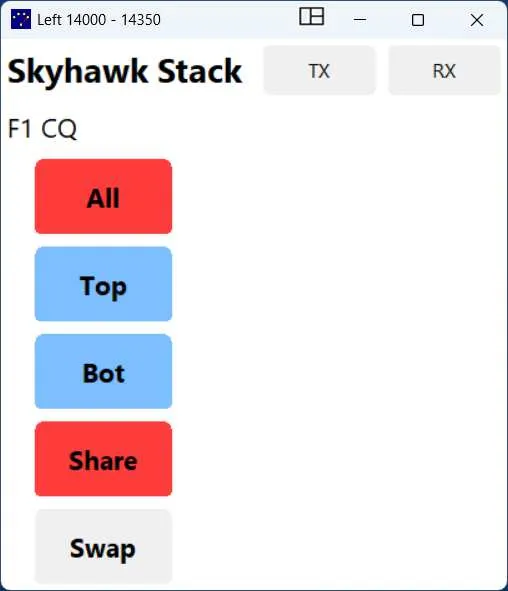
Additive Antennas (Stacks)
Section titled “Additive Antennas (Stacks)”A grid of buttons is good for controlling an antenna such as a stack. A stack of three Yagis has seven possible combinations, which would be a lot of buttons. However it can be set up as an additive antenna.
This shows such a stack. The individual antennas can be selected and deselected. They are additive buttons because alternately pressing them will add the antenna to the stack or remove it.
There is an extra button which will select the entire stack. It is an exclusive button. Pressing it will not remove anything from the stack. This button is not necessary because all of the antennas can be selected by pressing the additive buttons. But it is convenient because it saves key presses.
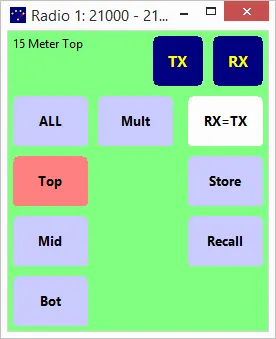
In this case just the top antenna is selected.
Clicking on the Mid button will select that antenna also:
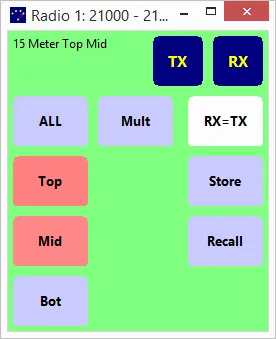
Pressing the ALL button or pressing the Bot button will cause all three antennas to be selected:

If a single antenna from the stack is desired the other two could be clicked to deselect them. Alternatively the window can be configured so that double-clicking or right-clicking a button will select that antenna exclusively and will deselect all others. On a touch screen a touch and hold can also do this.
Layout Rotation and Flipping
Section titled “Layout Rotation and Flipping”The button layout is controlled by the server. However the client can rotate it or flip it if desired. Here is the previous layout but flipped left to right:
The Antenna Selector can be run on any PC that can connect to the server. The only restriction is that if it is not on the same PC as the logging program it cannot display the antennas for the radio with logging focus.
Transmit / Receive Status
Section titled “Transmit / Receive Status”The Antenna Selector can show the transmit / receive status of the radio if the server is configured to do this. It will also indicate that the radio is inhibited and cannot transmit and that the server is not able to communicate with the switch. This is done by changing the colour of the window background or of the background behind the antenna name.
This is an example of the antenna name colour being changed. The colours are configurable:
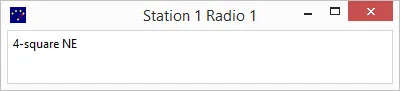
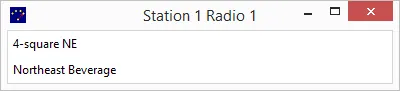
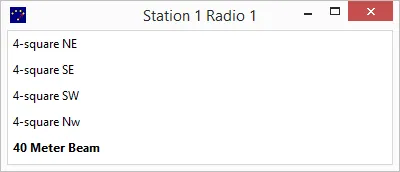
Logger Messages
Section titled “Logger Messages”The antenna selector can display the F-key messages from N1MM Logger Plus: